|
Step 1: Configure Output and Layers |
  
|
|
Step 1: Configure Output and Layers |
|
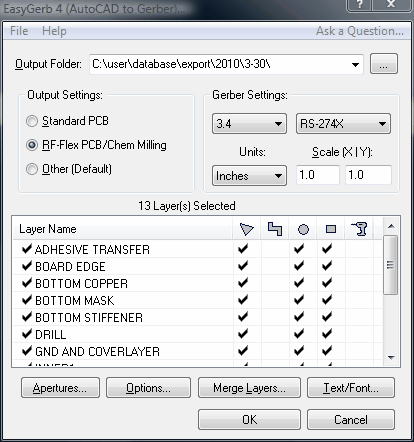
Start EasyGerb, and configure.
![]()
![]() Note: This Step-by-Step instruction assumes that you have already loaded EasyGerb into your AutoCAD version. If you haven't successfully loaded EasyGerb yet, goto Loading EasyGerb into AutoCAD.
Note: This Step-by-Step instruction assumes that you have already loaded EasyGerb into your AutoCAD version. If you haven't successfully loaded EasyGerb yet, goto Loading EasyGerb into AutoCAD.
Command Sequence
1. Open sample AutoCAD drawing file "PCB.dwg". This file is located in the folder: ...\EasyGerb\Examples.
2. At the command prompt type: "easygerb". The main EasyGerb dialog will now appear.
3. Verify the Output Folder. The location where you want EasyGerb to output Gerber files.
![]() Windows Vista Users: You will need to choose an Output Folder that you have write permission to. If not, EasyGerb will complain that it cannot write files to the output folder. We recommend outputting to a temporary folder like "Documents\EasyGerbTest" (see below).
Windows Vista Users: You will need to choose an Output Folder that you have write permission to. If not, EasyGerb will complain that it cannot write files to the output folder. We recommend outputting to a temporary folder like "Documents\EasyGerbTest" (see below).
![]() Note: In this example we chose a folder doesn't exist yet: Documents\EasyGerbTest - this can be very useful because EasyGerb will automatically create the new folder, and all data exported will be placed into this folder.
Note: In this example we chose a folder doesn't exist yet: Documents\EasyGerbTest - this can be very useful because EasyGerb will automatically create the new folder, and all data exported will be placed into this folder.
4. Go to "Output Settings:", and select "Standard PCB". This feature quickly optimizes your layer settings (such as FCB![]() , OWP
, OWP![]() , FRD
, FRD![]() ,FRS
,FRS![]() ,DRL
,DRL![]() ) for the most common type of drawing you're translating - in this case a "PCB"
) for the most common type of drawing you're translating - in this case a "PCB"
![]() Note: To review the Layer Table Options (such as FCB
Note: To review the Layer Table Options (such as FCB![]() , OWP
, OWP![]() , FRD
, FRD![]() ,FRS
,FRS![]() ,DRL
,DRL![]() ) , see EasyGerb Dialog: Main
) , see EasyGerb Dialog: Main
5. Verify all other settings, and press OK.
Next: Step-by-Step Instructions: Select Objects
![]() Note: If you need to review (in more detail) the EasyGerb Main options, goto: EasyGerb Dialog Reference: Main
Note: If you need to review (in more detail) the EasyGerb Main options, goto: EasyGerb Dialog Reference: Main
(Screen capture of EasyGerb main dialog - before conversion of PCB.dwg)