Converts a PCB drawing created in AutoCAD to Gerber(s) using EasyGerb.
![]()
![]() Note: This Learn Guide assumes that you have already loaded EasyGerb into your AutoCAD version. If you haven't successfully loaded EasyGerb yet, goto Loading EasyGerb into AutoCAD.
Note: This Learn Guide assumes that you have already loaded EasyGerb into your AutoCAD version. If you haven't successfully loaded EasyGerb yet, goto Loading EasyGerb into AutoCAD.
Command Sequence
1. Open sample AutoCAD drawing file "PCB_target.dwg". This file is located in the folder: ...\EasyGerb\Examples.
2. At the command prompt type: "easygerb". The main EasyGerb dialog will now appear.
3. Verify the Output Folder. The location where you want EasyGerb to output Gerber files.
4. Go to "Output Settings:", and select "Standard PCB". This feature quickly optimizes your layer settings (such as FCB, OWP, FRD,FRS) for the most common type of drawing you're translating - in this case a "PCB".
![]() Note: To review the Layer Table Options (such as FCB, OWP, FRD,FRS) , see EasyGerb Dialog: Main
Note: To review the Layer Table Options (such as FCB, OWP, FRD,FRS) , see EasyGerb Dialog: Main
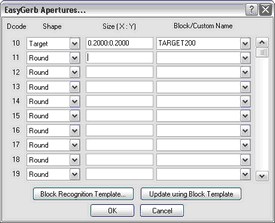
5. Click button "Apertures...". You will see the EasyGerb dialog appear.
6. Map Block "TARGET200", to Dcode 10 (as the shape "Target" size 0.200 inch). (See Below for reference).
![]() Note: To review the Aperture Table Options (such as Mapping Blocks to Dcodes) , see EasyGerb Dialog: Apertures
Note: To review the Aperture Table Options (such as Mapping Blocks to Dcodes) , see EasyGerb Dialog: Apertures

7. Click button "OK" to close Apertures dialog.
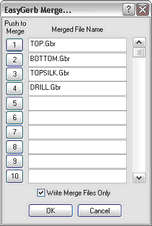
8. Click button "Merge Layers..." to create 4 merged layers.

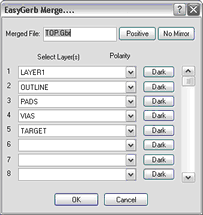
9. Click button "1" to create the first layer merge. The composite merge dialog will appear.
10. Enter Merged File: "Top.gbr"
11. Assign Layers to Merge: LAYER1, OUTLINE, PADS, VIAS, TARGET (see below for example)

12. Press button "OK" to return to the Merge Dialog.
13. Click button "2" to create the first layer merge "BOTTOM.GBR". The composite merge dialog will appear.
14. Enter Merged File: "BOTTOM.GBR"
15. Assign Layers to Merge: LAYER2, OUTLINE, PADS, VIAS, TARGET
16. Press button "OK" to return to the Merge Dialog.
17. Click button "3" to create the first layer merge "TOPSILK.GBR". The composite merge dialog will appear.
18. Enter Merged File: "TOPSILK.GBR"
19. Assign Layers to Merge: SILKSCREEN, OUTLINE, TARGET
20. Press button "OK" to return to the Merge Dialog.
21. Click button "4" to create the first layer merge "DRILL.GBR". The composite merge dialog will appear.
22. Enter Merged File: "DRILL.GBR"
23. Assign Layers to Merge: PADS, VIAS
24. Press button "OK" to return to the Merge Dialog.
25. Press button "OK" to return to the Main Dialog.
26. Press button "OK" to select objects.
27. Select Objects and "Right Click" to begin the translation.
That's It, EasyGerb is Finished!
28. Review the EasyGerb Finish dialog.